The Yoast SEO plugin is pre-installed on our class WordPress blogs. You can find it on the left hand nav menu - it is called "SEO". First, we'll be working with Titles & Metas.
Titles & Metas
If you don't know what title and meta description tags are, you'll first want to read my blog post about them. In the Yoast SEO submenu, you can select the "Titles & Metas" option.
The first thing you'll want to do is take a look at the title and description for your home page. The title is coded to dynamically add content from your current site name, page name, and site description - but you can change this based on Google's requirement that a title be unique, descriptive, and accurate.
Write a description for your site that is also unique, descriptive, and accurate that further describes to a potential reader what your blog is about. Think about keywords you want your blog to be associated with.
When you're done, click "Save Changes". Next, you'll enable Facebook Open Graph Protocol tags.
Facebook Open Graph Protocol Tags
Before you complete this step, you should read my blog post on Open Graph Protocol (You can ignore the part about Blogger code - that was what students in the past had to deal with).
Once you're open graph enlightened, go ahead and select the "Social" option from the Yoast SEO Plugin submenu.
You'll want to make sure that under the "Facebook" tab, that Open Graph meta data is set to "Enabled." This will automatically use the title and meta description tags you wrote from the previous step and add open graph tags that use the same data.
If you want to customize the title or description of your home page, you can do so in the section called "Frontpage settings". You can also upload a preview image to use for your blog's home page. This image should conform to Facebook preview image standards.
- For best display, use an image that is 1200 x 630 pixels.
- Note that images in other sizes and aspect ratios may get cropped.
- Next best image size is 600 x 315 pixels. Images smaller than this will appear in a smaller preview size.
- Facebook will not display a preview image smaller than 200 x 200 pixels.
Ok - now you're ready to write title and meta description tags for your individual blog posts. There isn't a submenu option for that. You'll do that while you're editing the post itself.
Adding Titles & Meta tags to Wordpress Blog Posts
Go to one of your blog posts and scroll down past your post copy. You should see a Yoast SEO content area:
This gives you a "Snippet Preview" of what your blog post's google listing will look like. As you can see, WordPress has automatically created a title based on the post title - and has autofilled the meta description with the first paragraph of your post. Let's make that a bit more readable by clicking "Edit Snippet".
You should make the title and description unique, accurate, and descriptive - while piquing the curiosity of the reader to get them interested in clicking on the post in Google Search results. For example, this is a better description than the first paragraph of the article:
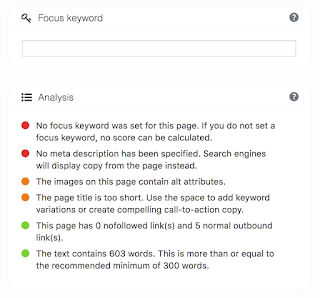
You can also designate a Focus Keyword for each post. A focus keyword is a word or phrase that you want your post to be associated with. In the example above, we might designate a focus keyword like "productivity apps".
The plugin gives you feedback on how well your page content and SEO tags relate to your focus keyword.
In general, you should fix things with red or orange dots until as many dots as possible are green.
Get into the practice and discipline of doing this for every blog post you write for maximum SEO benefit.
Ready to check your work?
SEO Tools To Check Your Tags
First you should check your title and meta description tags by using the SEOCentro Meta Tag Analyzer.
Then check your open graph tags with the Facebook Sharing Debugger.


